crafty fails
Today I was going to post a photo of my super new scrapbooking organiser that I was going to use for my Project Life supplies this year. I was going to have it all set up today, with all the cards neatly organised and it was going to look brilliant.
I decided to use the “Magic Happens” collection from Kaisercraft on this project, because it’s cute and has fairies and stars, and I don’t get much opportunity to use it on scrapbooking layouts.
This is the product, from Kaisercraft.
There are a couple of examples of what it could look like on that page.
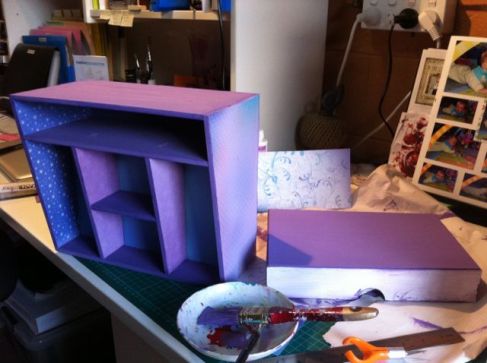
Mine currently looks like this:
 I’ve only ever done one similar project, a desk caddy, and I remember it took me a long time to finish. There were a few little tricks and tips that I probably picked up during that project, but had totally forgotten about when it came time to do this one.
So for my own future reference, here are some things to keep in mind when putting together one of these “beyond the page” products.
All of these are extremely obvious to anyone except me.
- If you’re covering any of the panels in paper, only do the inside walls and panels before you put the thing together. If you want the paper to cover the join between the panels and the base, don’t cover the outside panels until you’ve put the thing together.
- If you do cover the outside panels first, only cut out the slots on the inside. Don’t cut out the slots on the outside or you’ll be able to see the bottom of the tabs when it’s assembled. (Yes, I really did this. Luckily I had another sheet of the paper so I could cover it over again.)
- Paint getting into the slots where the tabs of the panels goes makes the slot thicker and makes it harder to slide the tabs together. Don’t get paint in there, or the whole thing will not go together very easily. (Hammer anyone?)
- The chipboard drawers are horrible. If anyone knows how to get them to hold together, I’d love to know.
- The recommendation in the instructions that you cover the entire front panel, including the front of the drawer, with a single piece of paper results in a lovely unbroken look, but it is a pain in the arse to get lined up exactly.
Anyway having learned all this the hard way, by lunch time today (I’ve been working on this on and off over the last few days, sticking, painting, waiting for stuff to dry) everything was finished and all I needed to do was seal it with a coat of Gesso.
Sorry, you said Gesso?
Yeah. That’s the stuff that seals everything so the paper will be a bit more durable. I used it on the desk caddy I did a couple of years ago. It gives it a nice finish. Goes on white, dries clear.
Um, are you sure you mean Gesso?
Yeah, Gesso. Look – it “creates a smooth, sealed white painting surface . . .” ohhhhhh
Yep.
It doesn’t dry clear does it?
Nope.
I was supposed to used Mod Podge wasn’t I?
Yep.
Ohhhhhhhh . . .
And what was the damage after that little painting frenzy? Let’s see . . . the base, the back, the side that I’d already re-covered once because point 2 above, the front that I had painstakingly managed to keep as an unbroken piece to line up with the drawer (point 5), and of course, the drawer itself.
All white.
Oh yeah.
Ohhhhh shit.
Salvage operations are currently underway.
This is why I don’t craft. Baking, business and gardening are much easier to bodge than craft and sewing. Good luck!
I think I should go back to gardening!